You enthusiastically started carving wooden spoons. You may even have bought a book or taken a beginner’s course. You have now made a number of spoons and would like to continue, but how do you get better at it? In this blog, I’ll share 13 spoon carving tips that helped me to carve better spoons.
1. Learn how to sharpen and keep your knives razor sharp
Even experienced spoon carvers sometimes fall into this pitfall and continue carving for too long without stropping or sharpening their knife. So make it a habit to strop regularly. Sometimes even in between. But at least after and before carving and sharpen your knives regularly. Do you have the feeling that instead of getting better, you are getting worse? Do you get streaks or scratches when you carve? There is a good chance that your knives are not sharp (enough), blunt or even damaged! Sharp tools are therefore not only safer, but also a basic requirement for achieving better results, which is why they are number 1, 2 and 3 on the list, but because otherwise this blog will be way too long, we continue to the next tip.

2. Stop sanding
The day I decided to stop sanding my spoons didn’t seem as beautiful at first. Then why stop sanding? Because this forces you to get the same and even better results with just the knife. You can no longer smuggle with by sanding. And a knife finish also gives a much “fresher” result. Beautiful facets remain and the shadow effects come into their own. You learn to carve “differently”, namely in a way that gives a smooth, even finish as quickly as possible. This is only possible by making the last cut in one carving movement with good sharp tools. In short, by not sanding you are forced to improve your knife technique, so that you learn to carve nicer spoons faster and easier. Whats more, it will save you time and dust. What to do with your leftover sandpaper? You can use that far better to keep your knives sharp!


3. Start working with thicker trunks/branches
In this way you are less dependent on what is “in the wood”. In other words, you don’t need to adjust the shape of your spoon because the branch is just too narrow, too thin, or too short. One way to create “conditions” as evenly as possible is to work with radially cleaved billets. This works best with thicker pieces of “straight” and predictable wood. Often you can get 2 to 4 radial and 4 tangential billets from a trunk. Do you not yet know these ways of splitting? Google it!
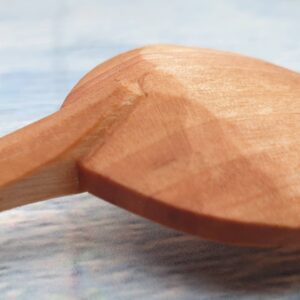
4. Keep your surfaces flat for as long as possible
Even if you want nice round shapes in your spoon, it helps to work from flat surfaces for as long as possible. The base for your spoon is a rectangle. As long as you work on the profile, you maintain these flat surfaces as much as possible. This also helps you keep the spoon “straight”. Only when the front and side views of the spoon are correct and your spoon is about the desired thickness, do you start creating more surfaces by carving off the corners. You repeat this as often as necessary. If you do this often enough, you will automatically get a smooth curve. For example, if you want to make a round handle on your spoon, you go from square-sided, to eight-sided, to sixteen-sided and so forth to a round and smooth surface.
5. Flesh on the bone and working order
Make sure you keep the bowl of the spoon a bit thicker and work on the handle first. Always look over your spoon to see if it is straight. It is easier to “straighten” a rotation of the handle relative to the bowl by taking some off the bowl. Are you satisfied with the handle and is your spoon as straight as you want it to be? Then you can start working on the bowl.
6. Taste your spoon
When you start working on the bowl, you start with hollowing out. The deepest point of your spoon is 1/3 or less from the handle. With a scoop, your deepest point can even be almost completely against the handle. The deepest point is about as deep as your upper lip is thick, so that your upper lip can, as it were, scrape the food off the spoon. If the bowl is deeper, the edges of your spoon will cut into the corners of your mouth. Do you want to top it off to perfection? Carve a slightly outwards sloping edge on the bowl of your spoon, so that it follows the shape of the mouth, as it were. What works very well is to try your spoon every now and then while carving. Yes I am serious, taste your spoon now and then. I call that ‘tasting’ your spoon.
7. The water test
Do you want to put your spoon to the test even further? For example to test whether it also works for soup? Then hold it under the tap and see what happens. Then you immediately notice whether the form works properly. Is the water still running off somewhere? Then your spoon is too narrow or too low or both. Then taste your spoon. Does the water stay on the spoon until you have it in your mouth? No, then see what you need to change so that is does. More depth in the back? Adjusting the angle?

8. Carve every day!
For example, choose an aspect or technique that you want to improve. Work attentively (always a good idea when working with a sharp knife) and repeat the “exercise” as often as needed. If you get faster, you can try carving one spoon in a day. Do this as often as you can. Preferably daily. Repetition and attention during the learning process are important in acquiring motor skills. When you sleep, your brain processes what you have learned and stores it. Your muscles learn what to do. This is often the reason people challenge themselves to carve one spoon every day for a year.
9. Repeat the same shape to perfection
Choose a spoon model and only start carving other models when you have mastered that model perfectly. Challenge yourself to carve a set of 4 or 6 of the same spoons. This helps you to understand and master a certain technique or shape to perfection.


10. Vary on a basic shape
Find out which variations you can make within the same spoon model. Consider working with a template and research how many different types of spoons you can carve from it. This is a good way to develop new techniques based on basic skills. Once you come across a “challenge” in the wood that requires an adjustment of the model, then you have the skillset to solve it.
11. Let your wood mature
If you work with harder woods, it helps to search for thicker and longer pieces of wood and let the wood mature for at least eight months. The wood becomes slightly softer and more homogeneous in structure and importantly also dryer. With dryer wood you can carve to the final cuts. This makes it easier to get a nice smooth and even finish. When you don’t have matured wood, you can partly accelerate this effect by keeping your blanks in a bag or container at room temperature for a few days, this way the wood won’t become drier, but it will get more homogeneous and easier to carve. You have to keep a close eye on this process though, otherwise you will have a slimy, smelly piece of wood to process. That is not necessarily a problem, because you can just wash the spoon and after the first cuts the slimy stuff is gone. So it’s something that can be solved, but avoiding it all together is much more pleasant.
12. Photograph your work
You may just as well keep your knife at hand, because the camera is merciless. Imperfections that you overlook with the “naked” eye become painfully visible on a photo. Many a spoon carver stands with the knife next to the camera removing those final imperfections before taking that perfect photo for the socials.
13. Teachers from the past and present
Learn from others. Don’t be put off by makers who say that a certain spoon shape is their signature design. Wooden cutlery has been made for centuries and many of today’s design choices or finishes can be seen in museums or in the cutlery of other cultures. Whether these are made of wood or not. Speaking of which, check out spoons at the museum as soon as that’s possible again (here in the Netherlands the museums are closed due to the pandemic). Some museums also have their spoons in the online collection. That is a great way to orient yourself and also a fantastic way to see spoons that are not part of the permanent exhibition. A disadvantage is that it is difficult to get a good idea of the scale.
In addition to our ancestors, we can also learn from our colleagues. Buy, trade, or borrow a spoon from a maker whose work you like. Study and try the spoon. How thin or thick is the bowl or handle. Have a look at the lines (just like you would in a sporty car). How is the connection of the bowl to the handle made. What is the curvature from the bowl to the handle? Where is the deepest point? Is the spoon big or small, are the lines angular or curved? Does it eat well? Can you eat from a bowl as well as from a plate? Could you carve these shapes yourself? Which elements do you want to apply in your own designs? All this helps you develop your own style.


Your golden spoon carving tips?
The above tips have helped me a lot to carve better spoons. I hope that with these spoon carving tips you can continue on your exploration through the world of the wooden spoon. Do you have any questions or would you like me to have a look at your spoons? Live or via Zoom? Send me a message. Did you use one or more of my spoon carving tips to make your spoon? Or do you have good spoon carving tips yourself? Share them with me by sending me a message via the site or Instagram. Maybe there will soon be a blog with spoon carving tips 14 to…?